Assets
Storyblok includes a native digital asset manager (DAM) to upload images, videos, audio, and text in popular formats (including PDF, DOC, and TXT). Navigate to the Assets tab to manage your files.
Assets in Storyblok can either be tied to a specific space or scoped under an organization and available as shared assets to selected spaces. This manual covers both space-scoped and shared assets. To manage and configure shared assets, see the Shared asset libraries section below.
Upload
Section titled “Upload”To upload one or more files, click Upload files or drag and drop them into the active window.
Inside the Upload window, rename the file, mark it as private, provide metadata via Advanced options, add more files, or delete assets before uploading. This is the only opportunity to rename the file, as file names cannot be changed after uploading.
Depending on the space settings, some metadata fields may be required during the upload process. In this case, select Advanced options and fill in the required fields at the top (marked with a red asterisk).
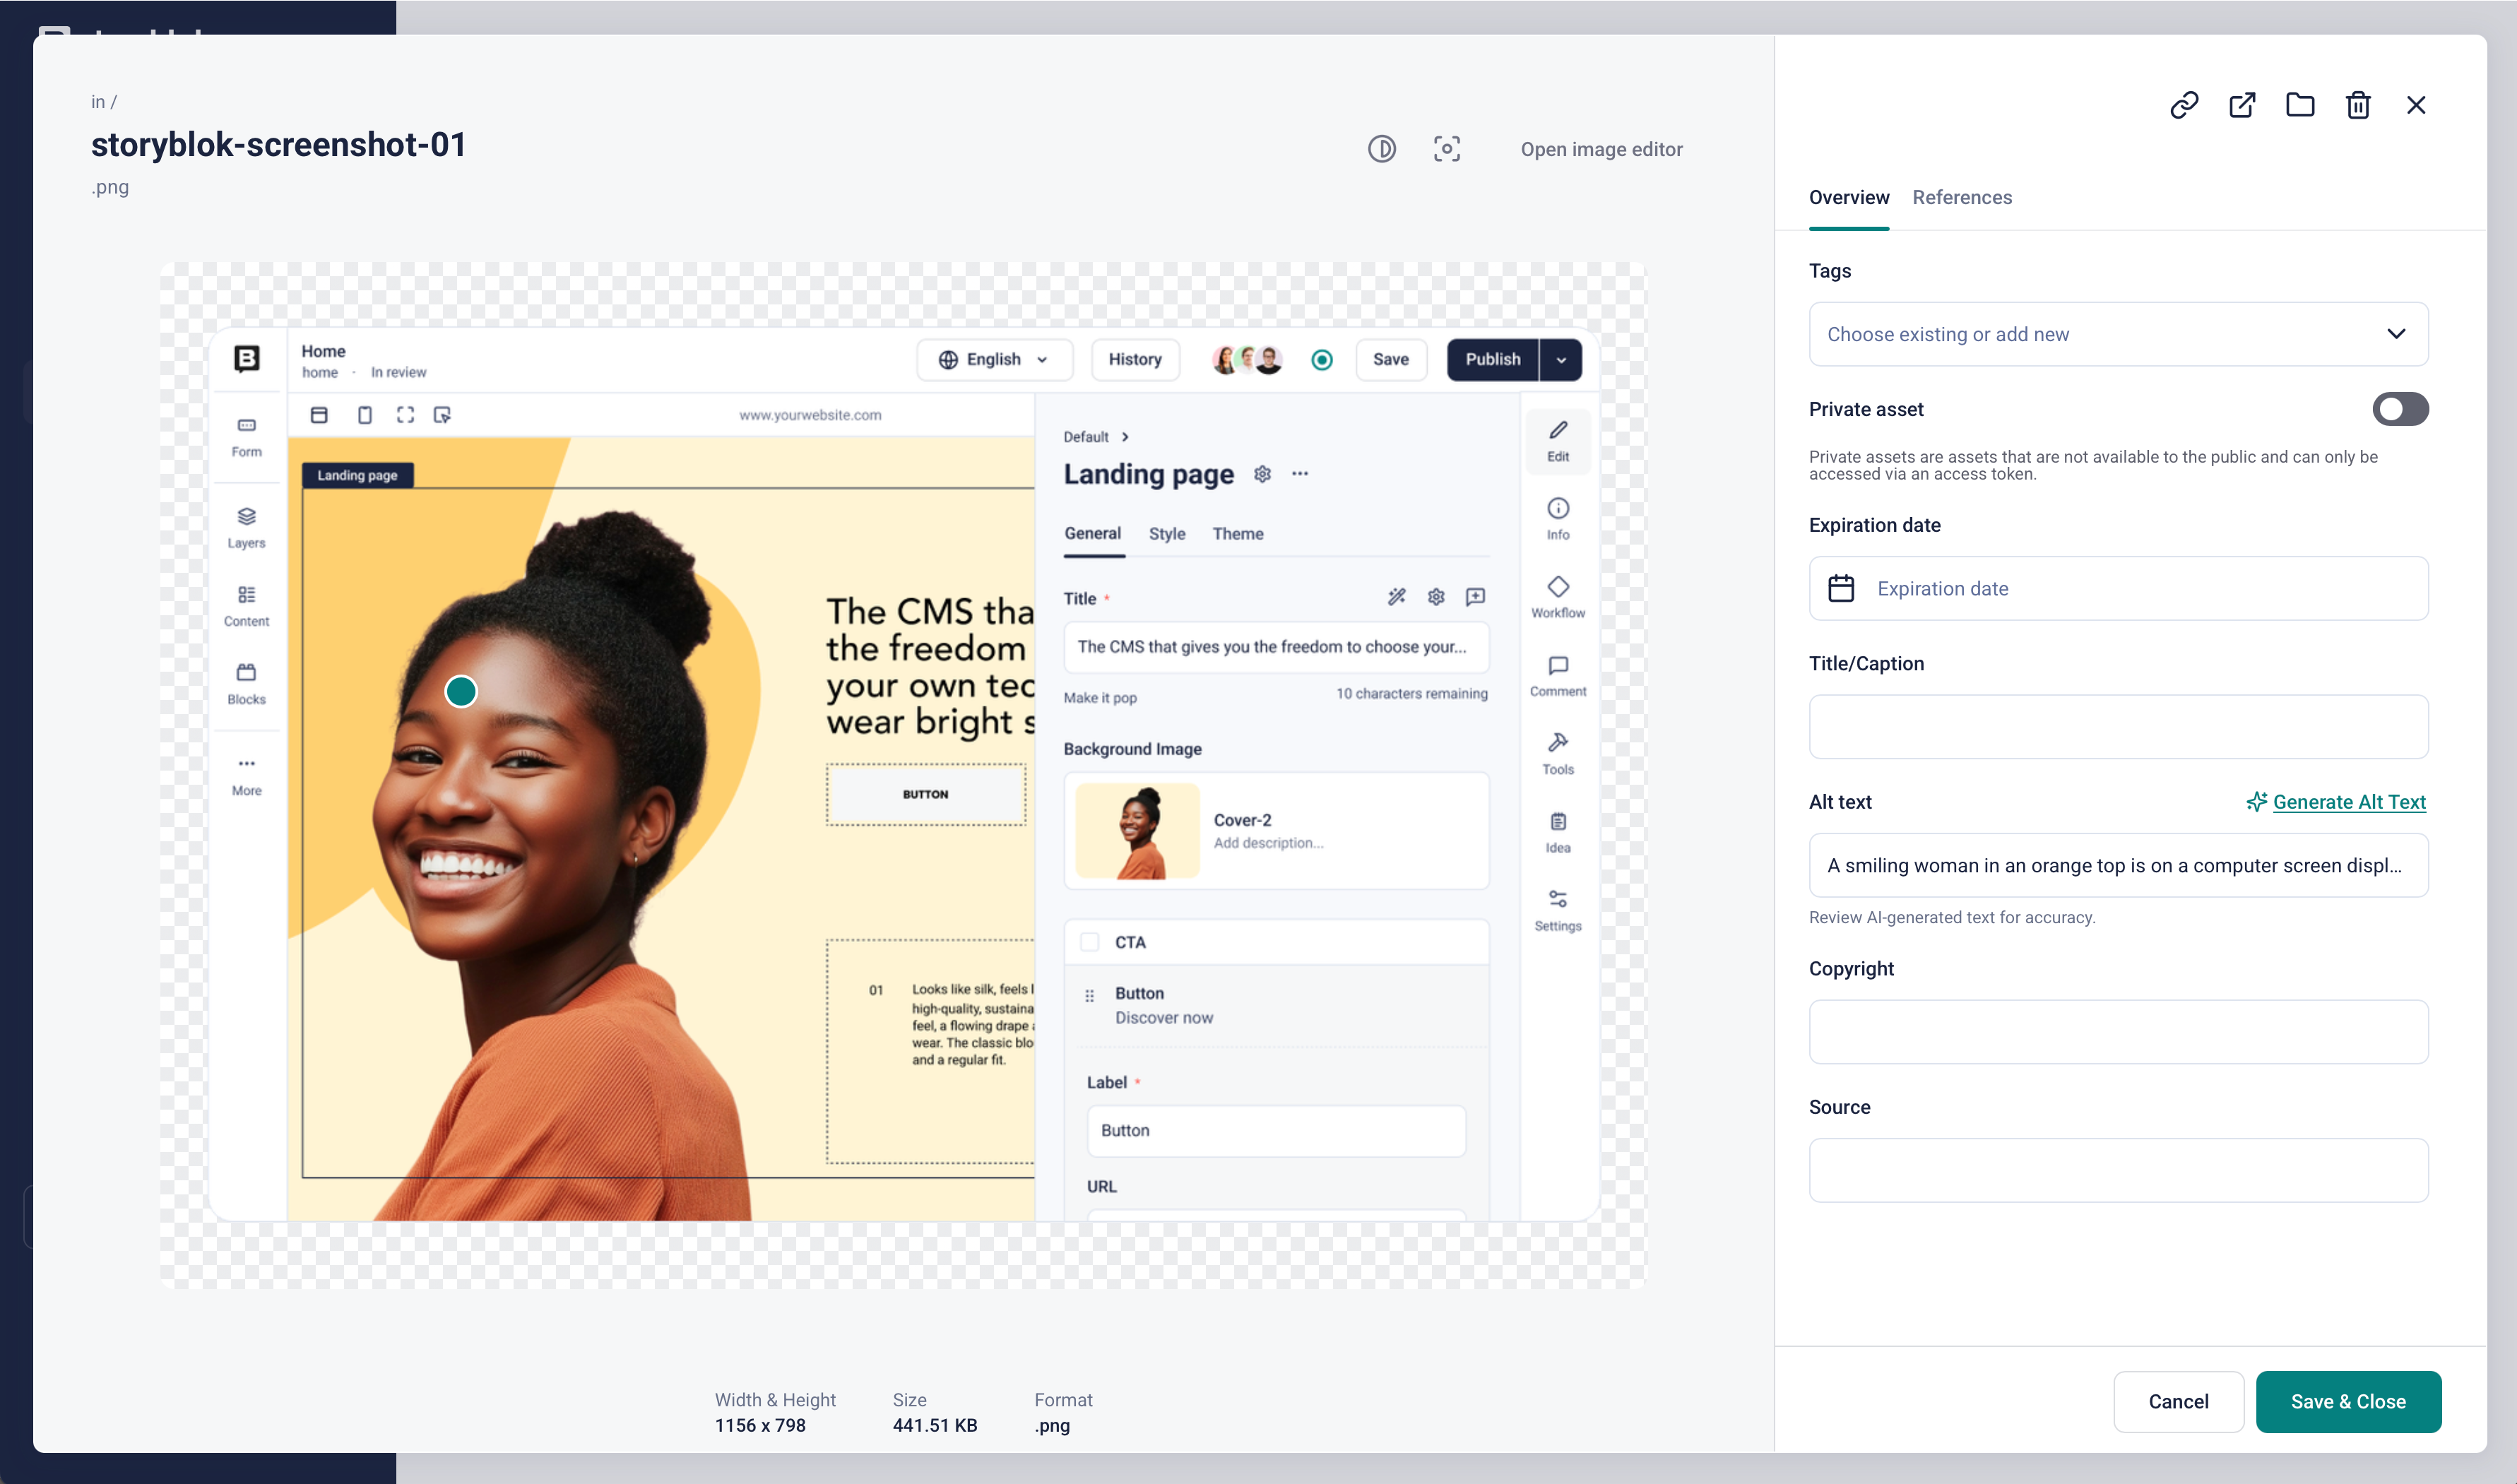
The asset overview window
When an asset is marked as private, it is hidden. To mark a file as private, toggle the lock button. Optionally, schedule a publishing date and time to make the asset public at a later date.
Organize
Section titled “Organize”Use the asset manager to search, filter, and sort files. The asset manager includes both a tagging system and a folder system for organizing assets.
Use the Search bar to find assets by file name or file type.
Use the Sort dropdown menu to order displayed assets. The default sorting is by creation date (that is, when assets were uploaded), from newest to oldest.
Use the Filter dropdown menu to perform an advanced search. Apply one or more filters and create queries to display results based on the relevant criteria.
Use the checkboxes to select assets and perform bulk actions.
The Deleted assets tab stores discarded files until emptying. To recover a deleted asset, click the restore icon. To recover multiple deleted assets, select them by their checkboxes and click Restore assets.
To “empty the trash”, click Permanently delete all. Note that this action cannot be undone and affects all assets. There's no way to remove files individually.
The tagging system offers a way to organize assets across folders. Asset tags are separate from block, story, and idea tags.
There are three ways to perform actions on a single file, each providing slightly different functionality.
- Click the asset to open the Overview window.
- Hover over the asset, open the three-dot menu, and click the relevant action.
- Select the checkbox in the upper-left corner and choose the relevant action from the top toolbar.
The universal actions available in all methods are:
- Preview
- Edit an image
- Copy the URL
- Move to folder
- Delete
To tag, move, or delete multiple assets, select them and then choose the desired option from the toolbar.
Open the Overview window to add or edit asset metadata such as tags, title, alt text, copyright, and other custom fields. Depending on the project's setup, this information may be visible on the website.
The Overview window provides additional options for JPEG and PNG files:
- Add a focal point. To mark the area that should remain centered when resizing the asset, hover over the image and click. To remove a focal point, click the camera focus button.
- Change the background color of a PNG file.
- Apply image transformations.
If AI alt text is enabled in your space (under Settings → AI Settings), the Generate Alt Text button will produce alt text for PNG, JPEG, and WEBP images. Always verify AI-generated text.
Translate metadata fields
Section titled “Translate metadata fields”To translate an asset's metadata fields, open the Assets library, select the file, and then choose a language from the drop-down. Toggle the globe icon to enable translation and provide the appropriate translation to match the Default language value.
The References tab on each asset displays the stories that include the asset.
The Replace Asset app will swap assets globally from the main asset manager window. This is useful when you need to upload a new version of a file that's used across multiple stories.
Shared asset libraries
Section titled “Shared asset libraries”A shared asset library enables assets to be available across multiple spaces. Navigate to Shared Assets in the organization settings to manage shared asset libraries.
Create a library
Section titled “Create a library”In the Shared Assets section of your organization settings, use the New Library button to create a new shared asset library. Enter a name and description, and also configure its region. Select a specific region to restrict access to assets from spaces in other regions.
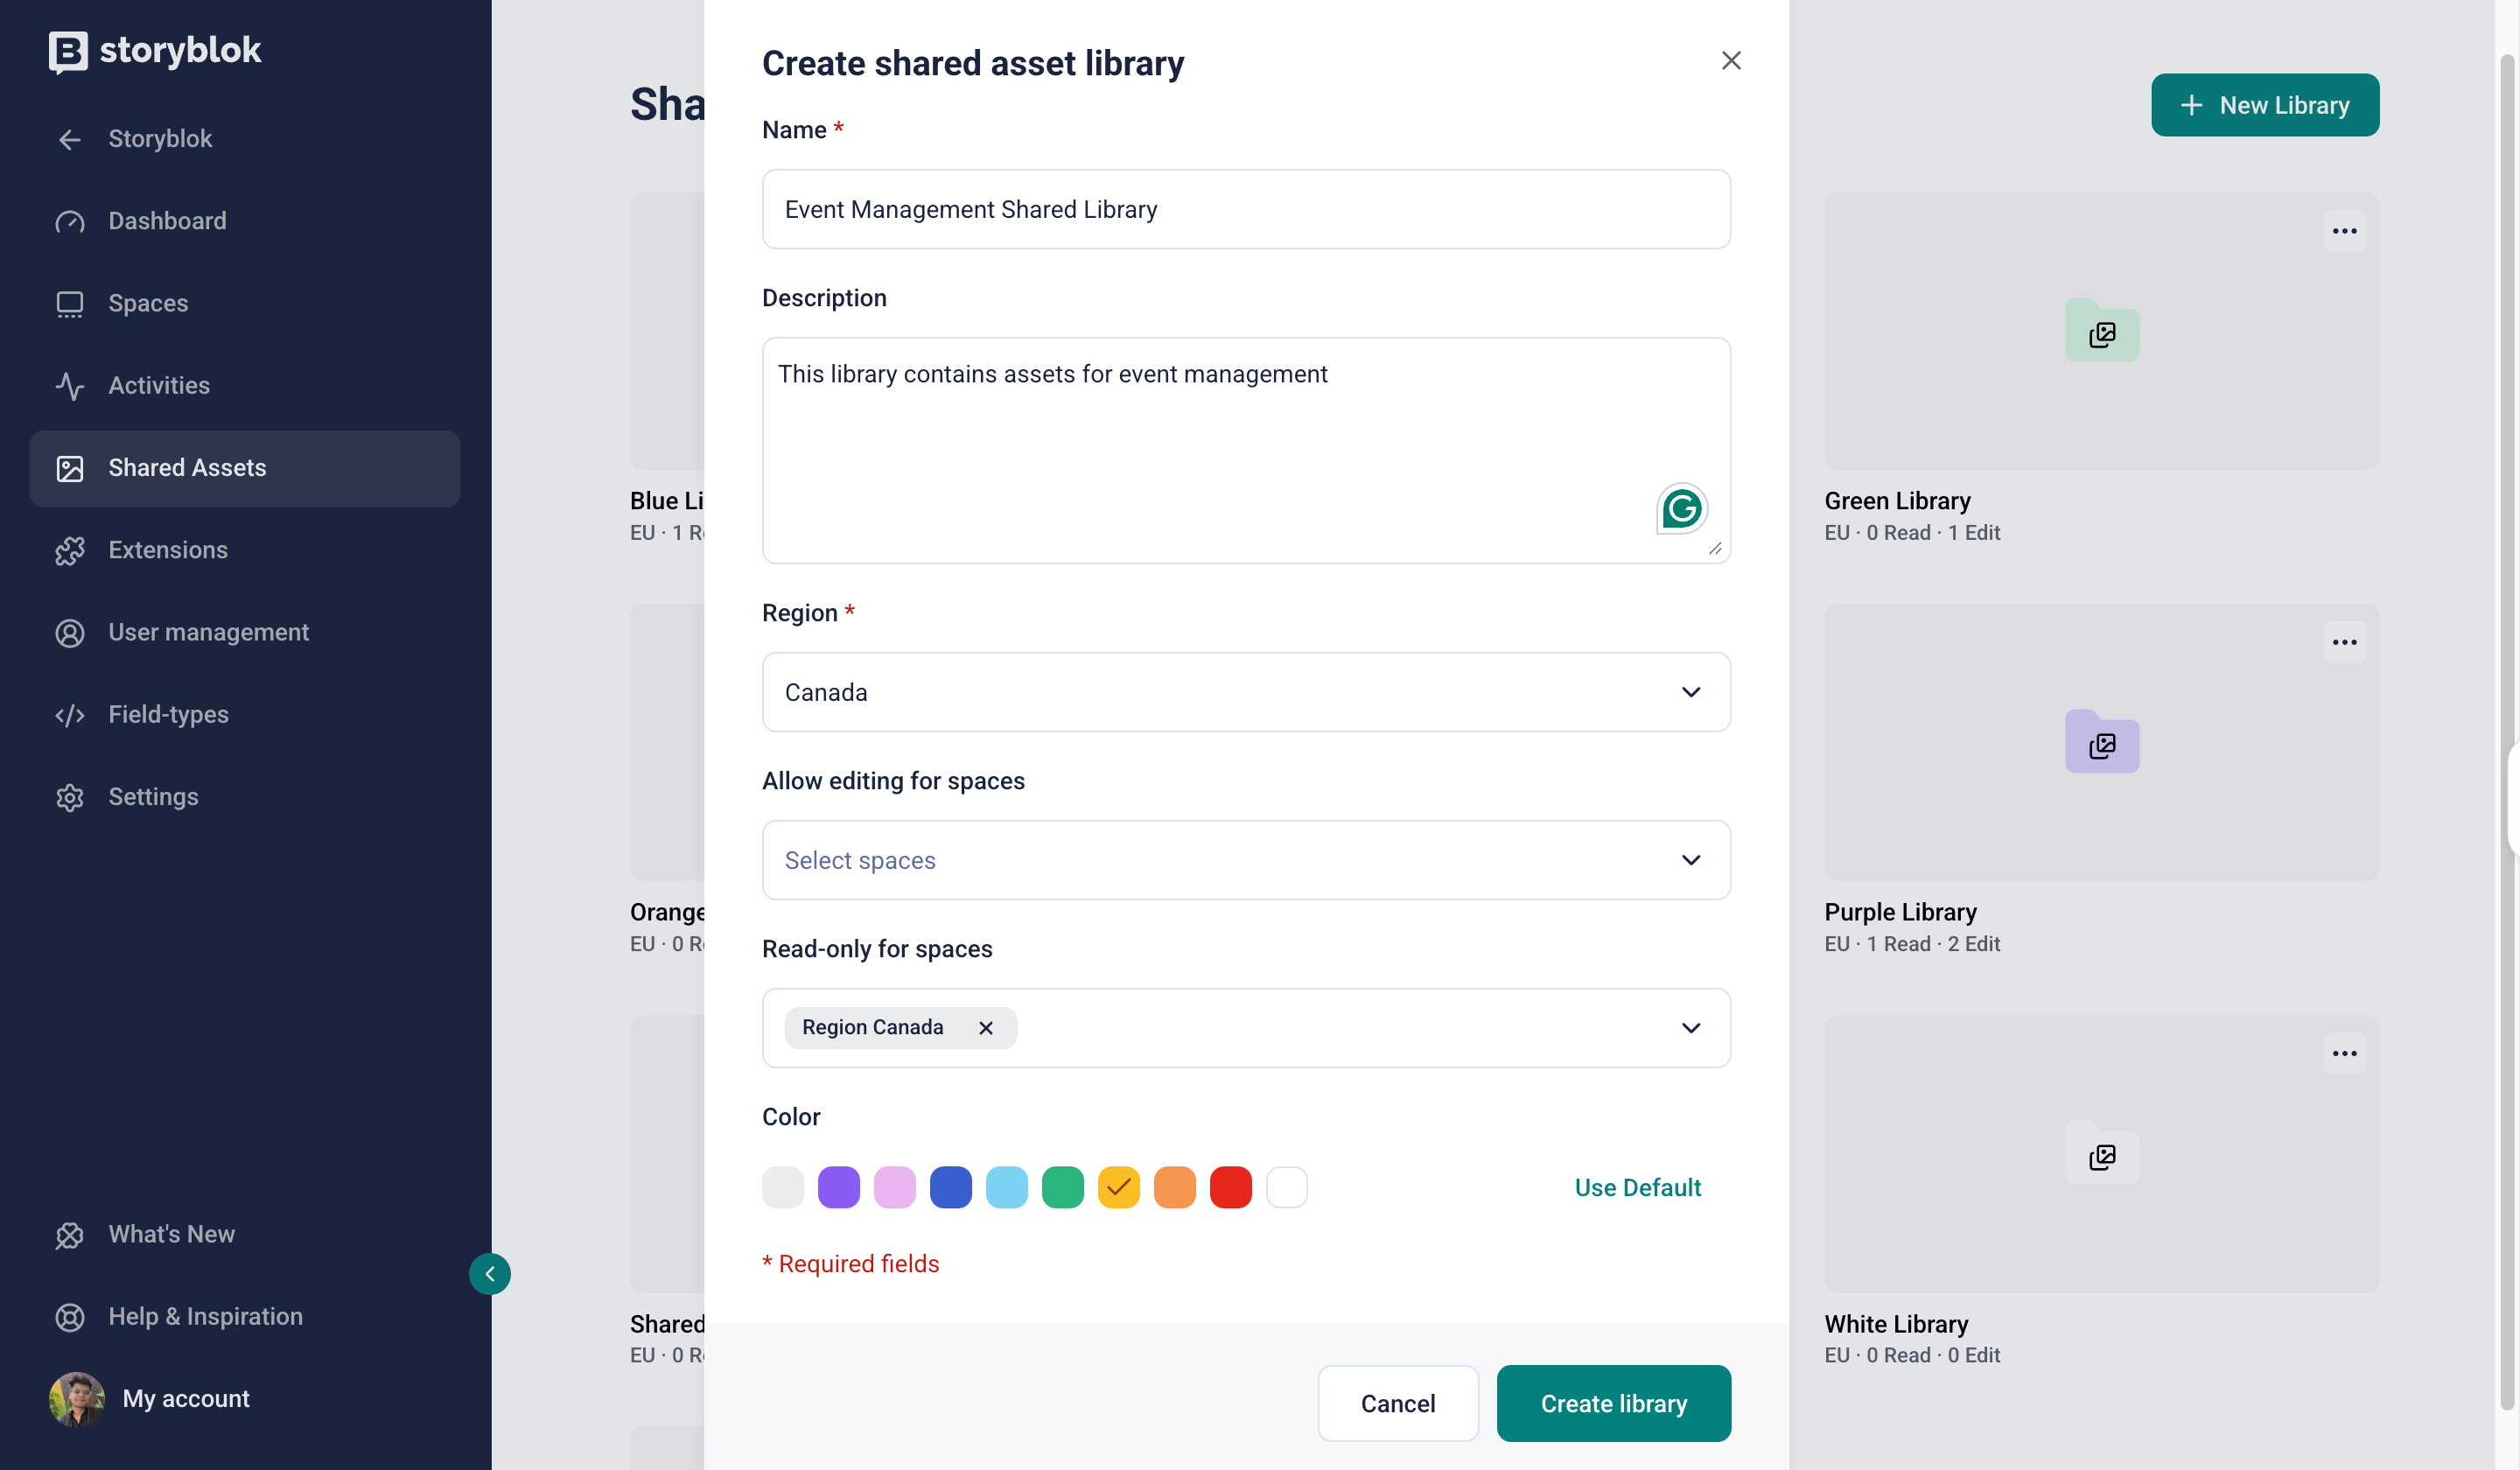
Create a new shared asset library
Manage space access
Section titled “Manage space access”Configure which spaces have access to the library's assets. Select which spaces can additionally edit assets and metadata under the Spaces with editing permissions dropdown. For read-only access, select specific spaces under the Spaces with read-only access dropdown.
To make changes to an existing library, hover over it, then choose Settings from the three-dot menu. You can duplicate an existing library using the Duplicate option.
Browse and manage assets
Section titled “Browse and manage assets”Shared asset libraries available to the current space are represented as separate tabs. Navigate to the relevant tab to browse and manage its assets. The actions you can take on a shared asset depend on the permissions defined for the shared asset library.
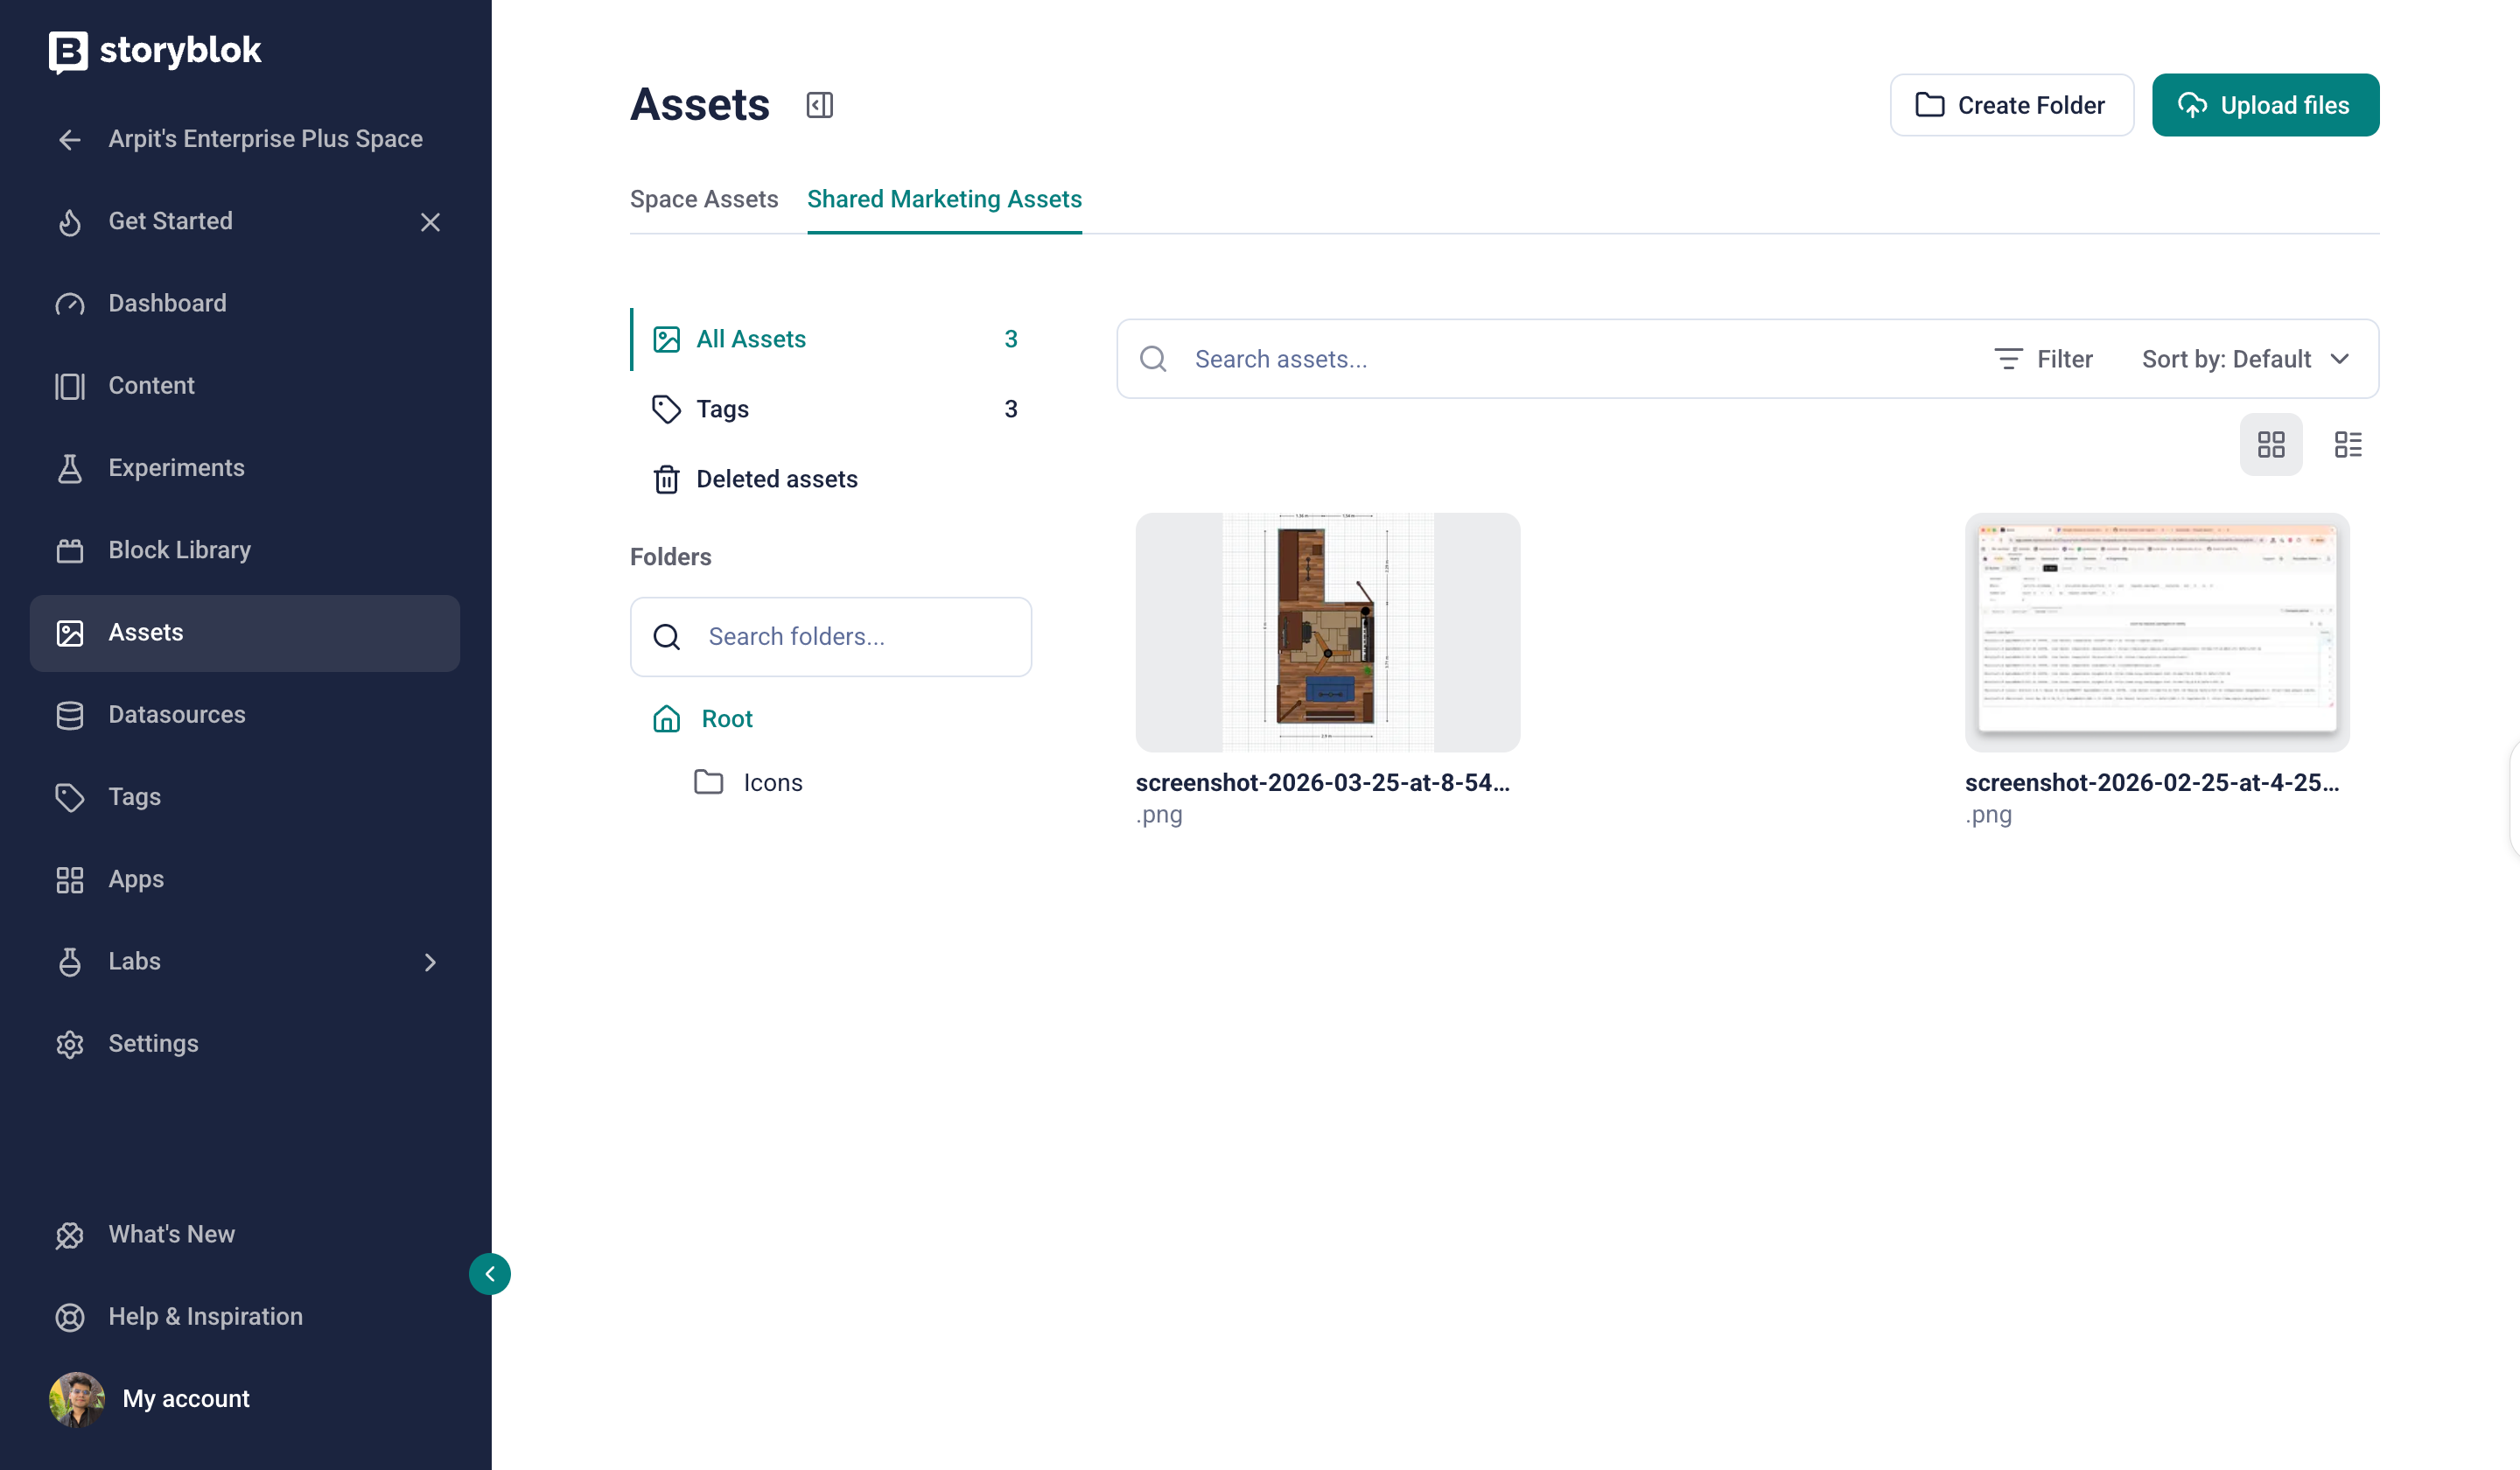
Browse shared assets in a space
Settings
Section titled “Settings”To manage shared asset libraries, navigate My Organization → Settings → Shared Assets in the organization settings. Learn more about the various settings you can configure in the Organizations manual.
Activities
Section titled “Activities”Navigate to the Activities tab in your organization's settings to monitor activities related to shared assets. Various filters are available to narrow the results to a specific set of activities.
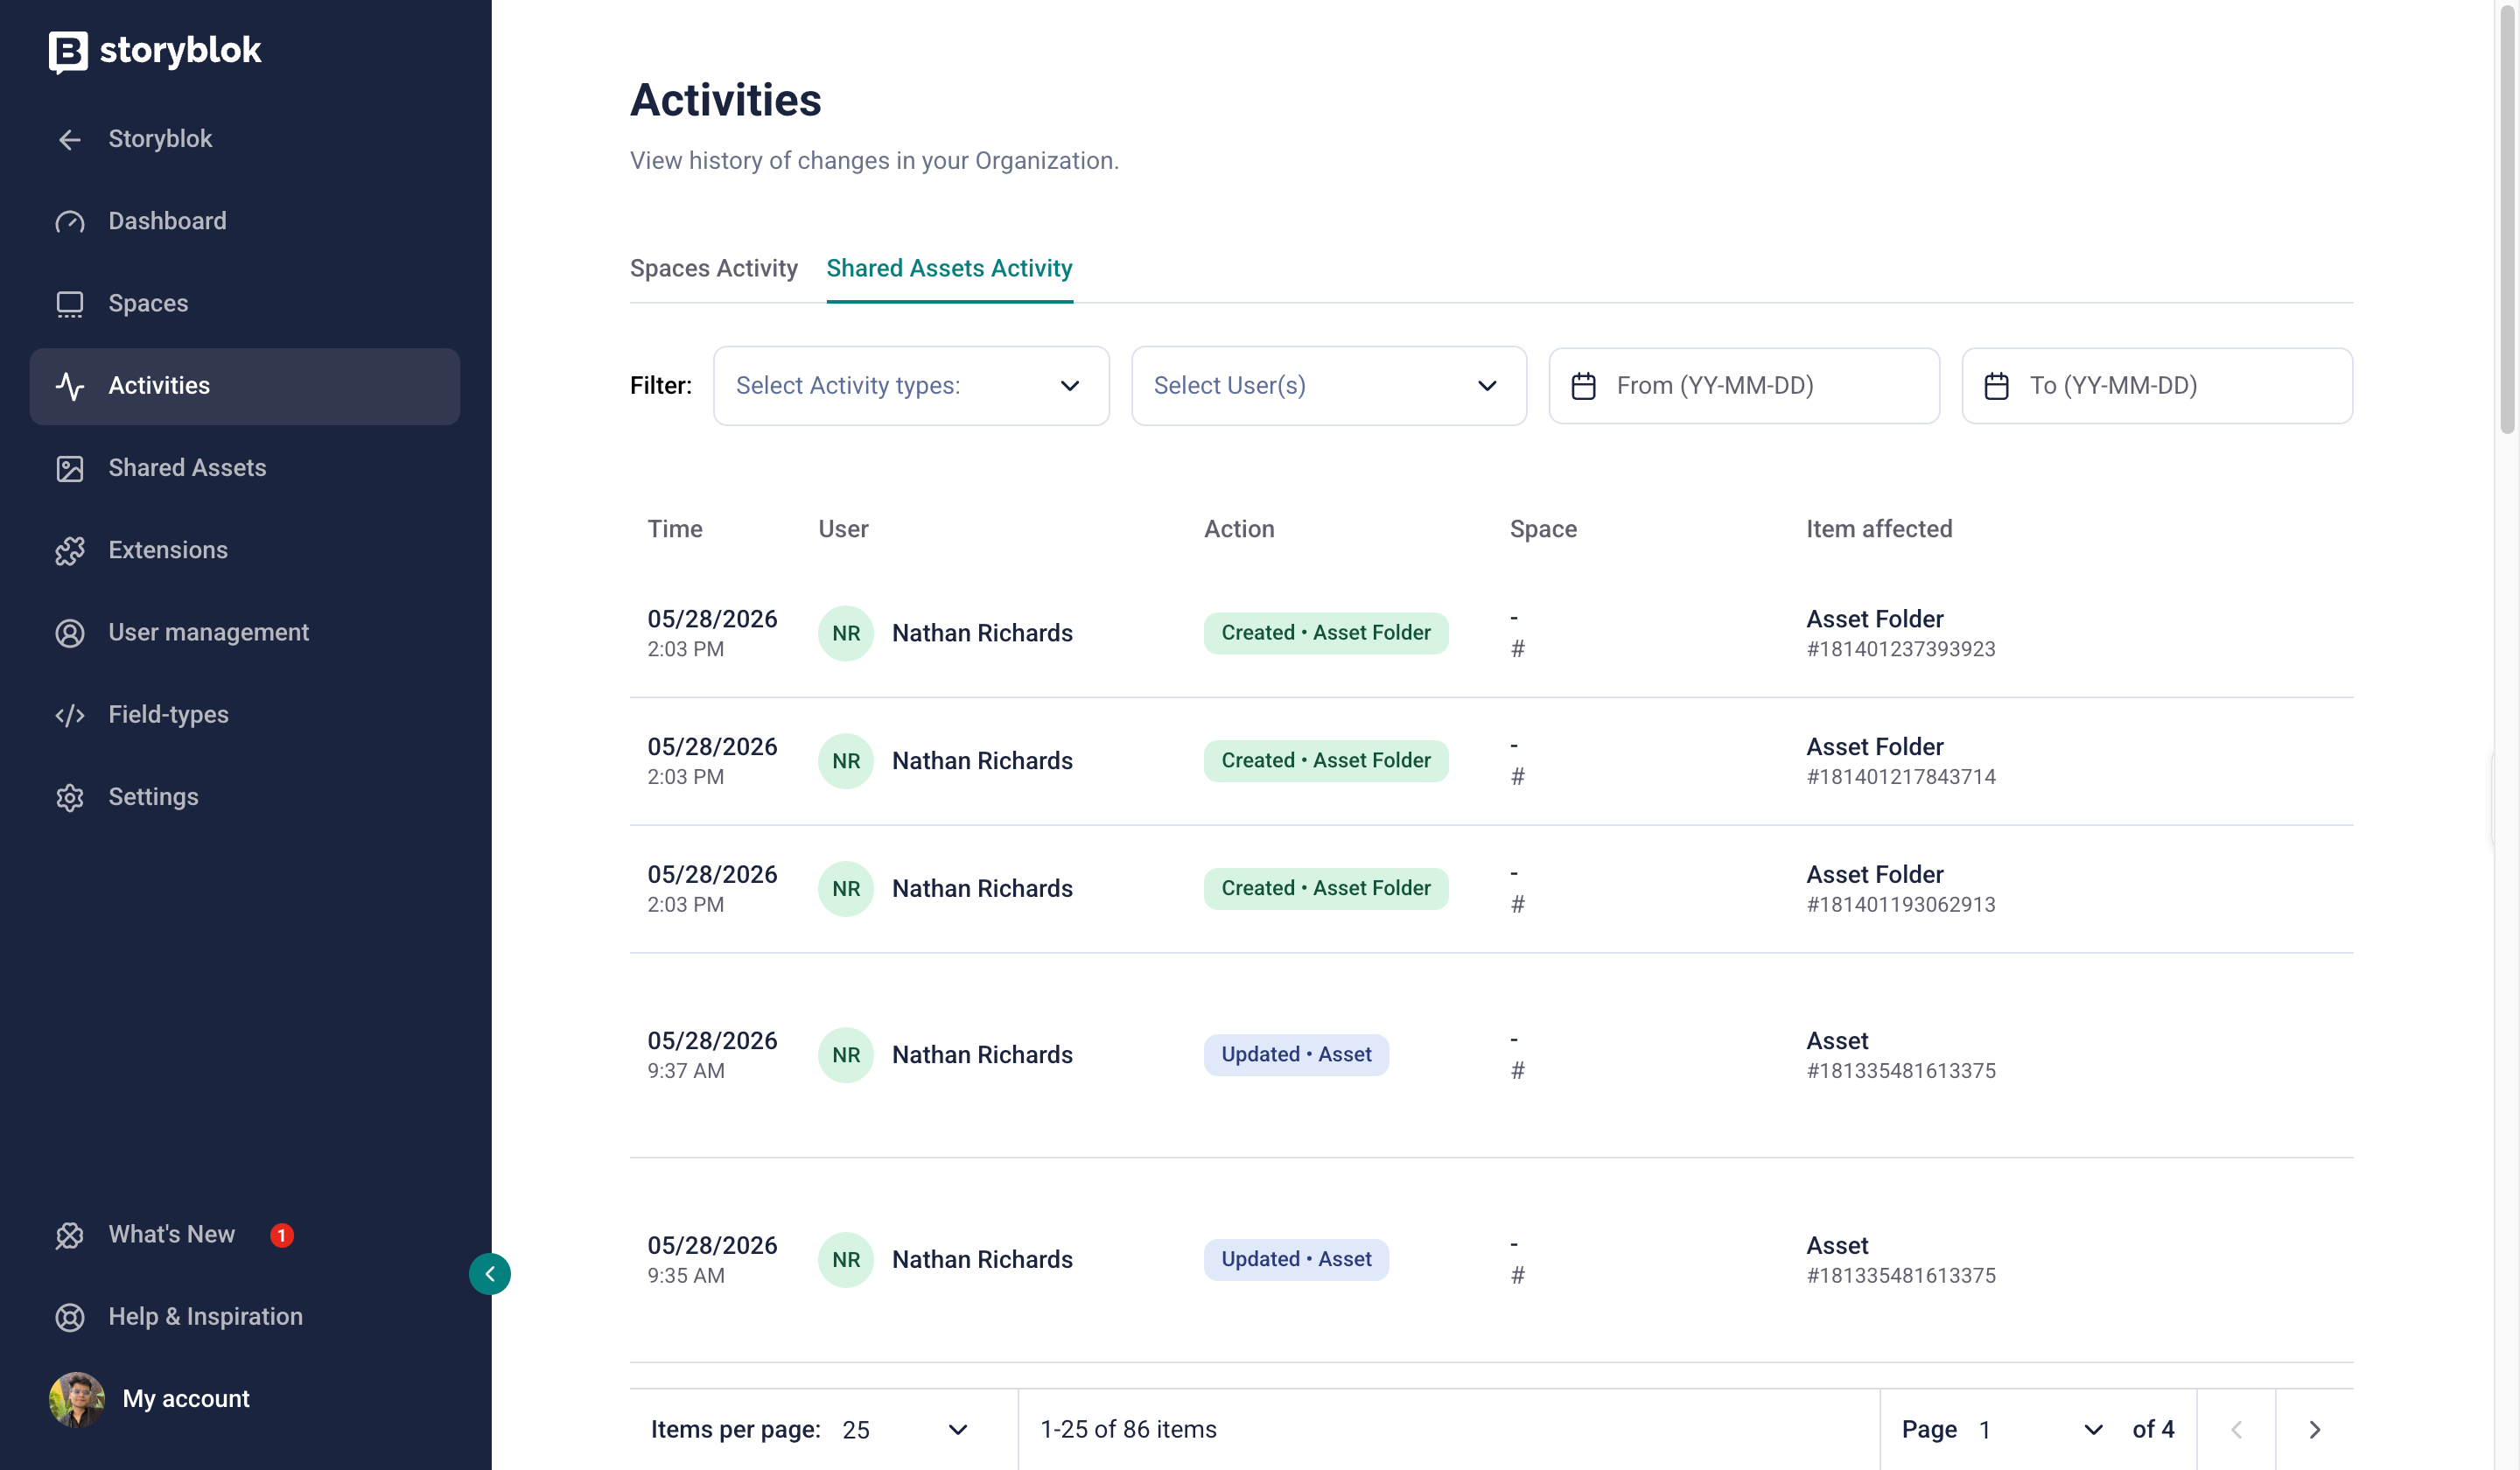
Activities for Shared Assets
Was this page helpful?
This site uses reCAPTCHA and Google's Privacy Policy (opens in a new window) . Terms of Service (opens in a new window) apply.
Get in touch with the Storyblok community